The PMS Interface Knowledge Base
Welcome to The Percentage App PMS Accounting Interface Knowledge Base and Resources Page. Here you will find information about how to use and setup our PMS interface applications as well as details to help you with troubleshooting any issues you come across.
Resources & Help for The Quickbooks Interface
Use our knowledgebase below to find out more about how to install and use The Percentage App Cloudbeds to Quickbooks online Accounting interface:
• Register a Percentage App Account here.
• Once registered you will receive an introductory email from our sales team (sales@thepercentageapp.co) along with a $1USD payment link.
• Once paid, your account will be created and you will receive the necessary login details and setup instructions by email.
NOTE: Before going further, please ensure that you are logged in to both your Cloudbeds myFrontdesk & Quickbooks online accounts in the same browser. Otherwise you'll be prompted to login during the process.
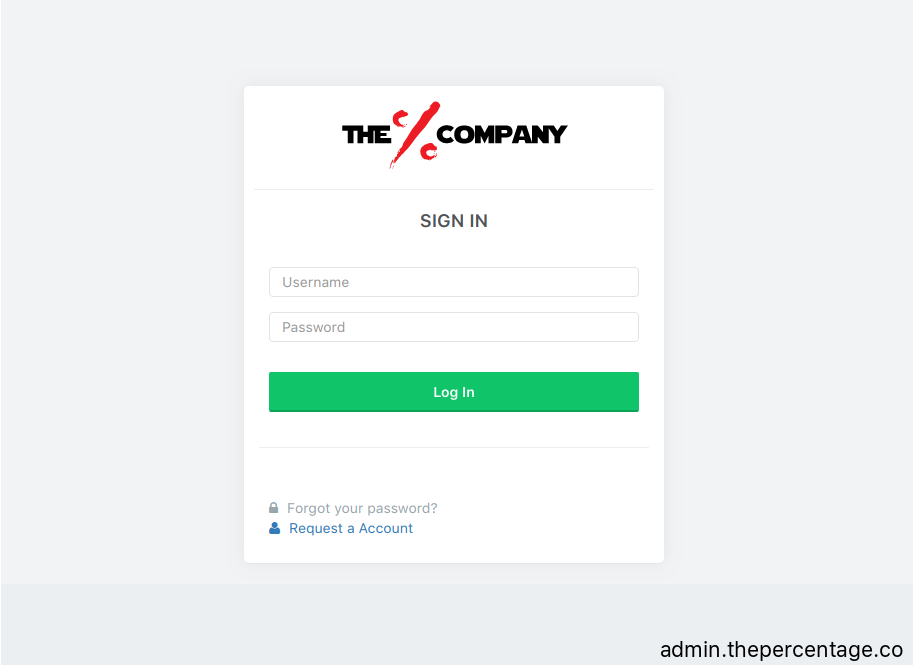
• Log in to The Percentage APP here.
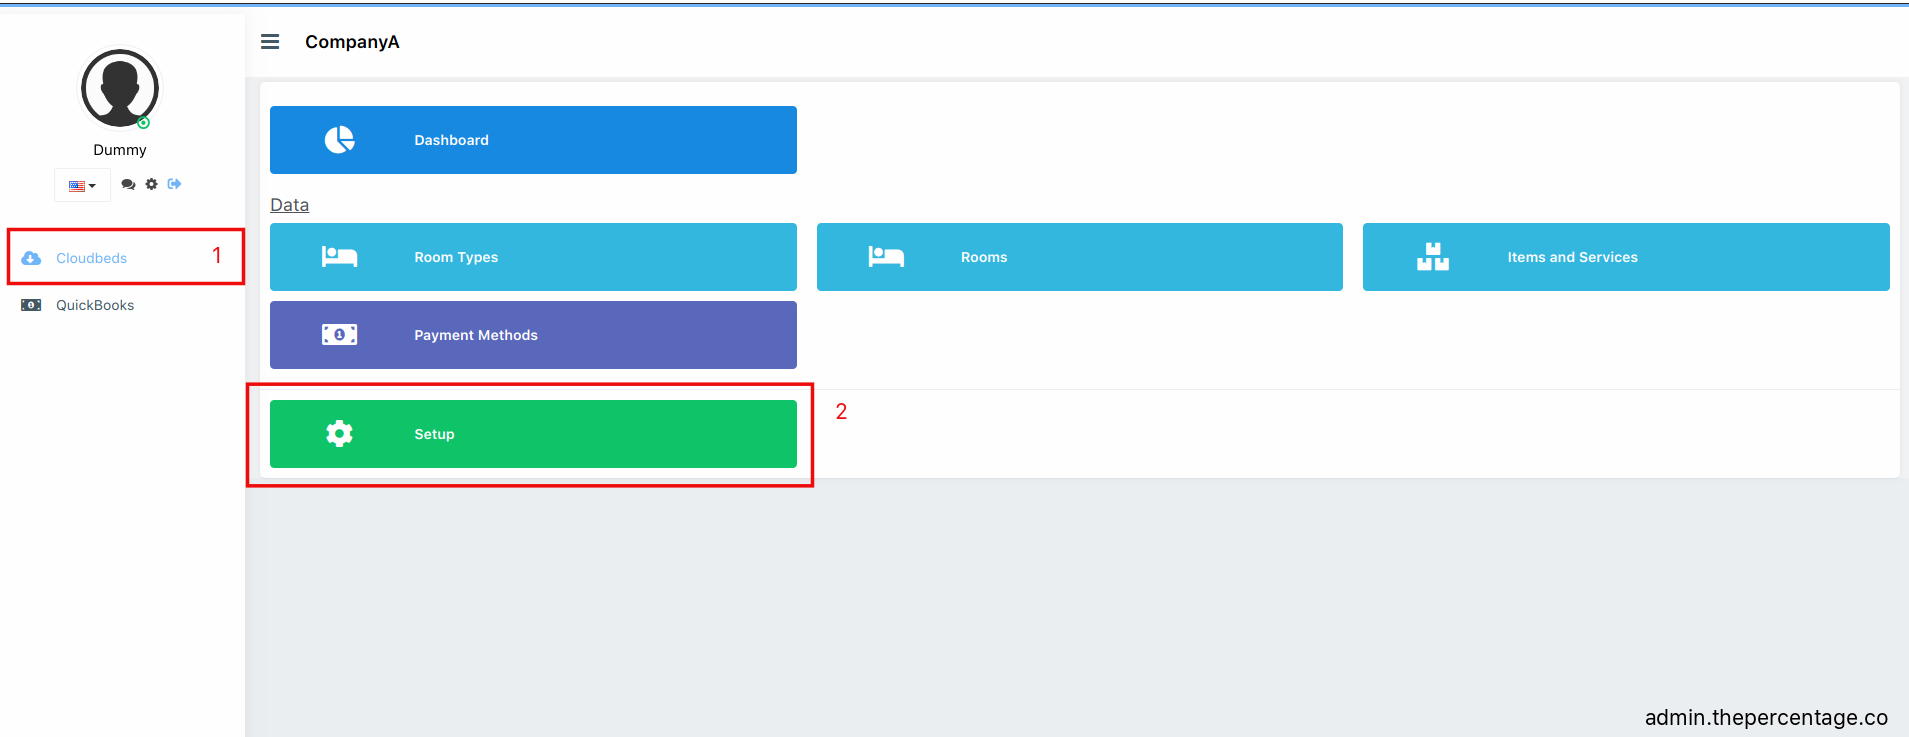
• Click on the Cloudbeds Button on the left hand menu and then click Setup.
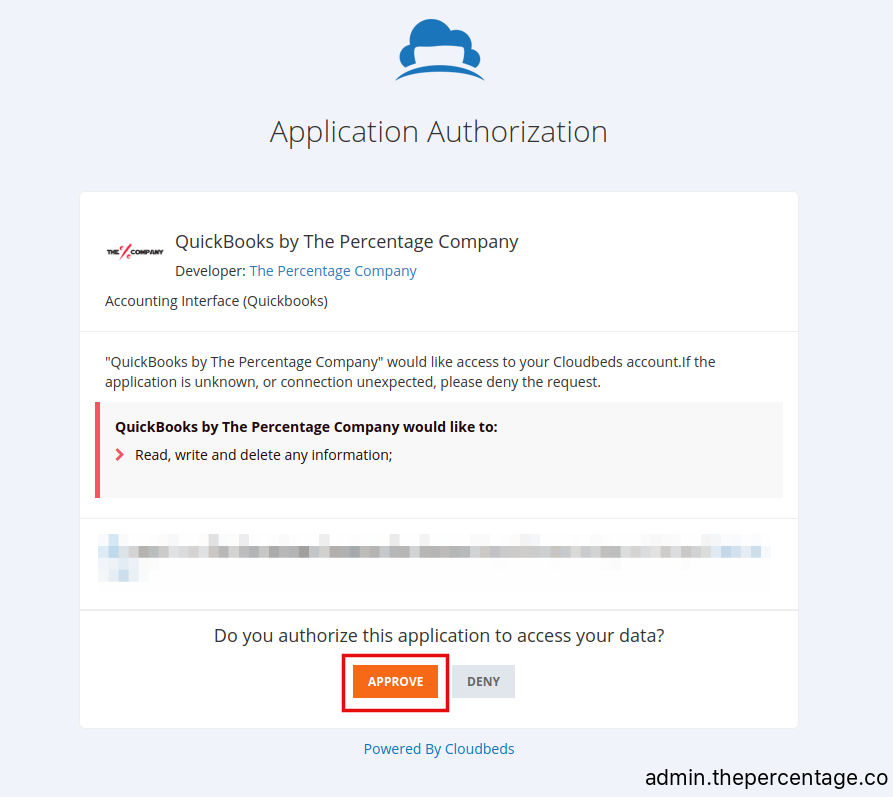
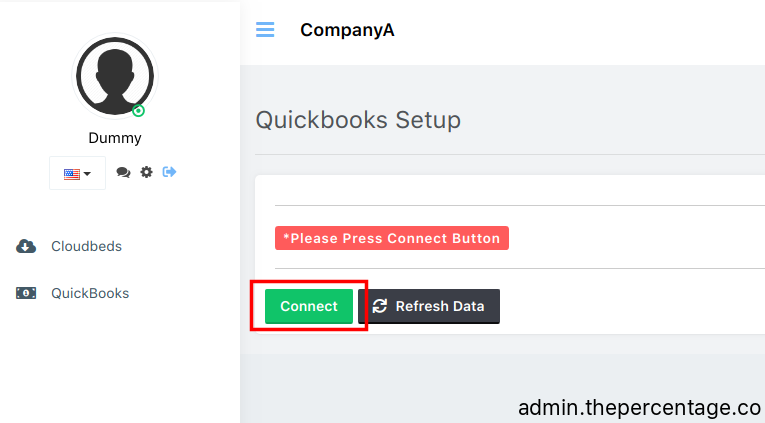
• Click on green “Connect” button, which will open the Cloudbeds’s Application Authorization page. Click "Approve" to allow The Percentage App to connect to Cloudbeds for the 1st time.
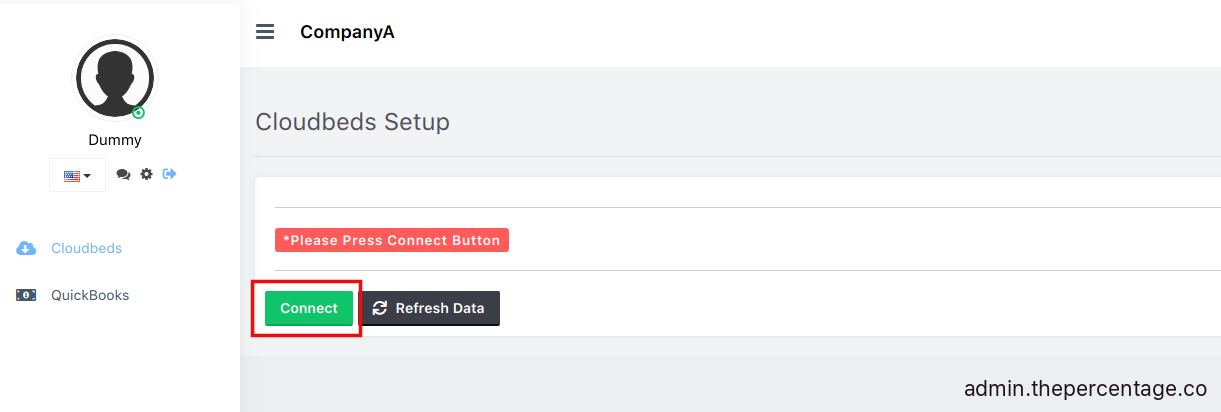
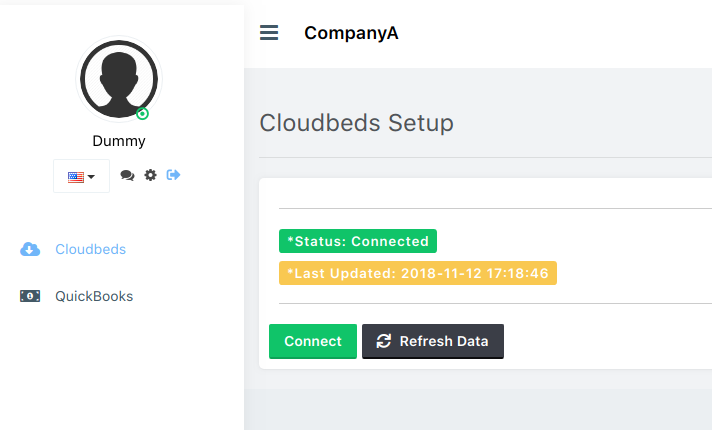
• Once the above process has completed successfully, it will show "Status: Connected" in green. If this does not show, please repeat the steps above.
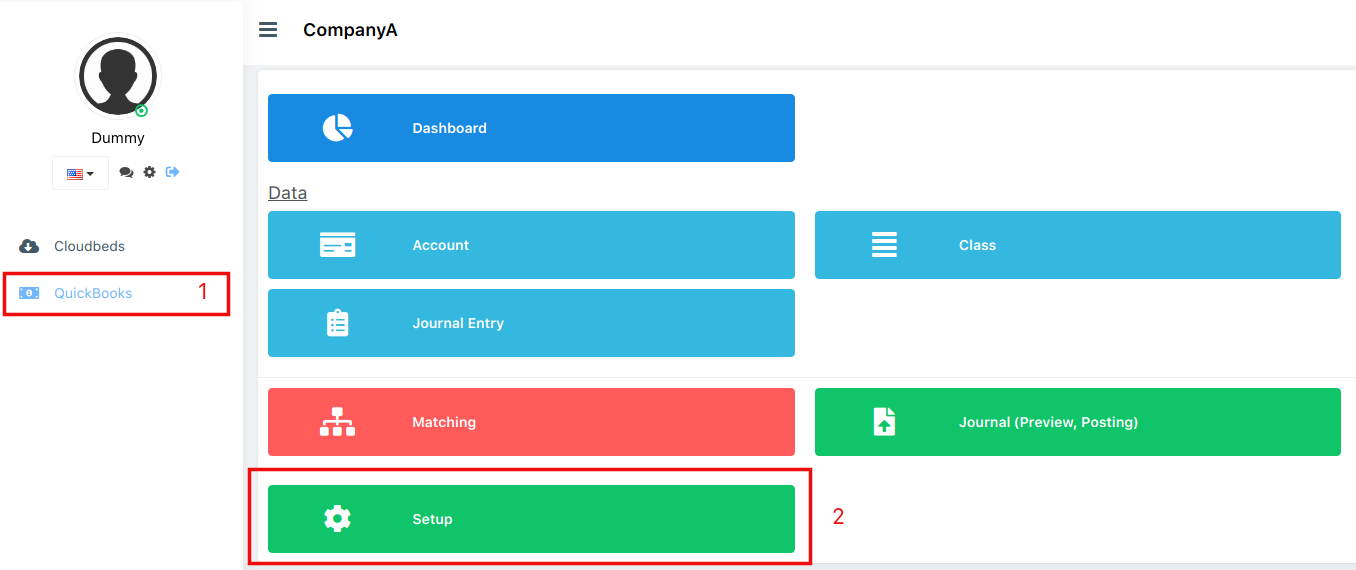
• Click on the Quickbooks Button on the left hand menu and then click Setup.
• Click on green “Connect” button, which will open the Quickbooks Online Application Authorization page. Click "Approve" to allow The Percentage App to connect to Quickbooks for the 1st time.
• Once the above process has completed successfully, it will show "Status: Connected" in green. If this does not show, please repeat the steps above.
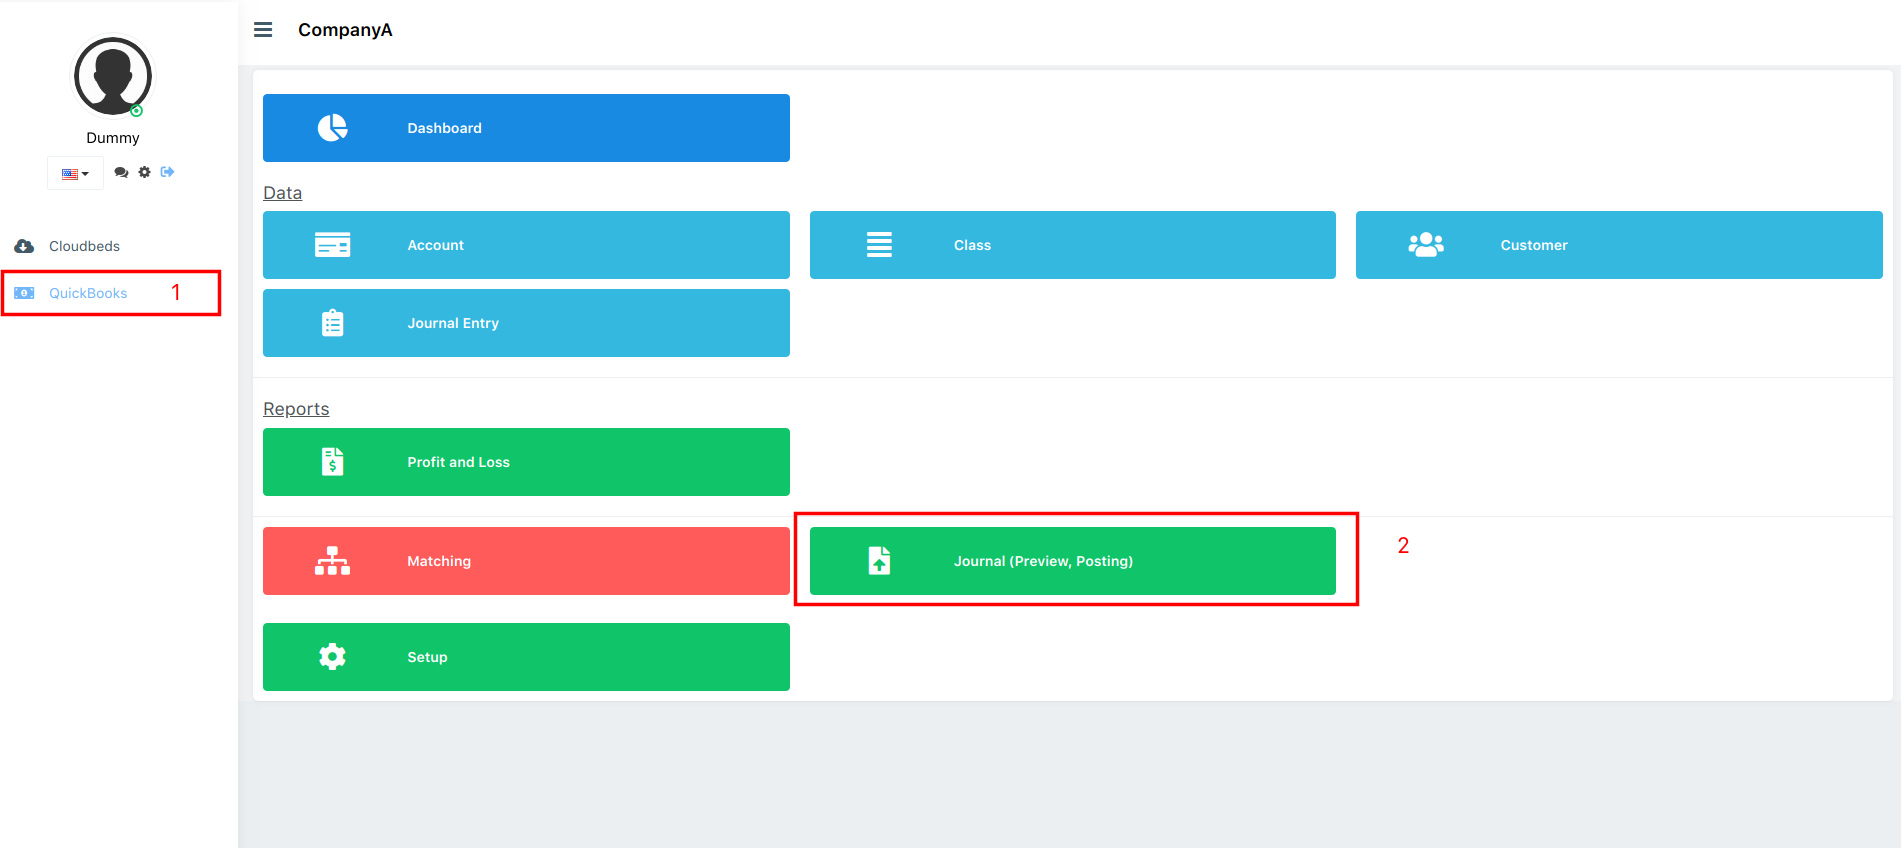
• Click on the "Quickbooks" Button on the left hand menu and then click "Matching"
• Add a G/L account for the "Balance Account", "Balance Customer", "Room Revenue Account" and "Room Revenue Class" then click Save.
• Select the "Items & Services" Tab and select an Item from the "Cloudbeds Item" drop down menu and match it to the corresponding G/L account in Quickbooks Online until there are no more Cloudbeds items to select and there are no items left in red under the "items not selected" heading. Then click Save
• Select the "Taxes & Fees" Tab and enter the "Code" from the Cloudbeds Taxes and Fees Configuration page and match it to the corresponding G/L account in Quickbooks Online until there are no more Cloudbeds taxes and fees to enter. Then click Save
• Select the "Payments" Tab and select an Item from the "Cloudbeds Item" drop down menu and match it to the corresponding G/L account in Quickbooks Online until there are no more Cloudbeds payments to select and there are no items left in red under the "items not selected" heading. Then click Save
• Select the "Credit Card (Payments)" Tab and select an Item from the "Cloudbeds Item" drop down menu and match it to the corresponding G/L account in Quickbooks Online until there are no more Cloudbeds Credit Card Payments to select and there are no items left in red under the "items not selected" heading. Then click Save
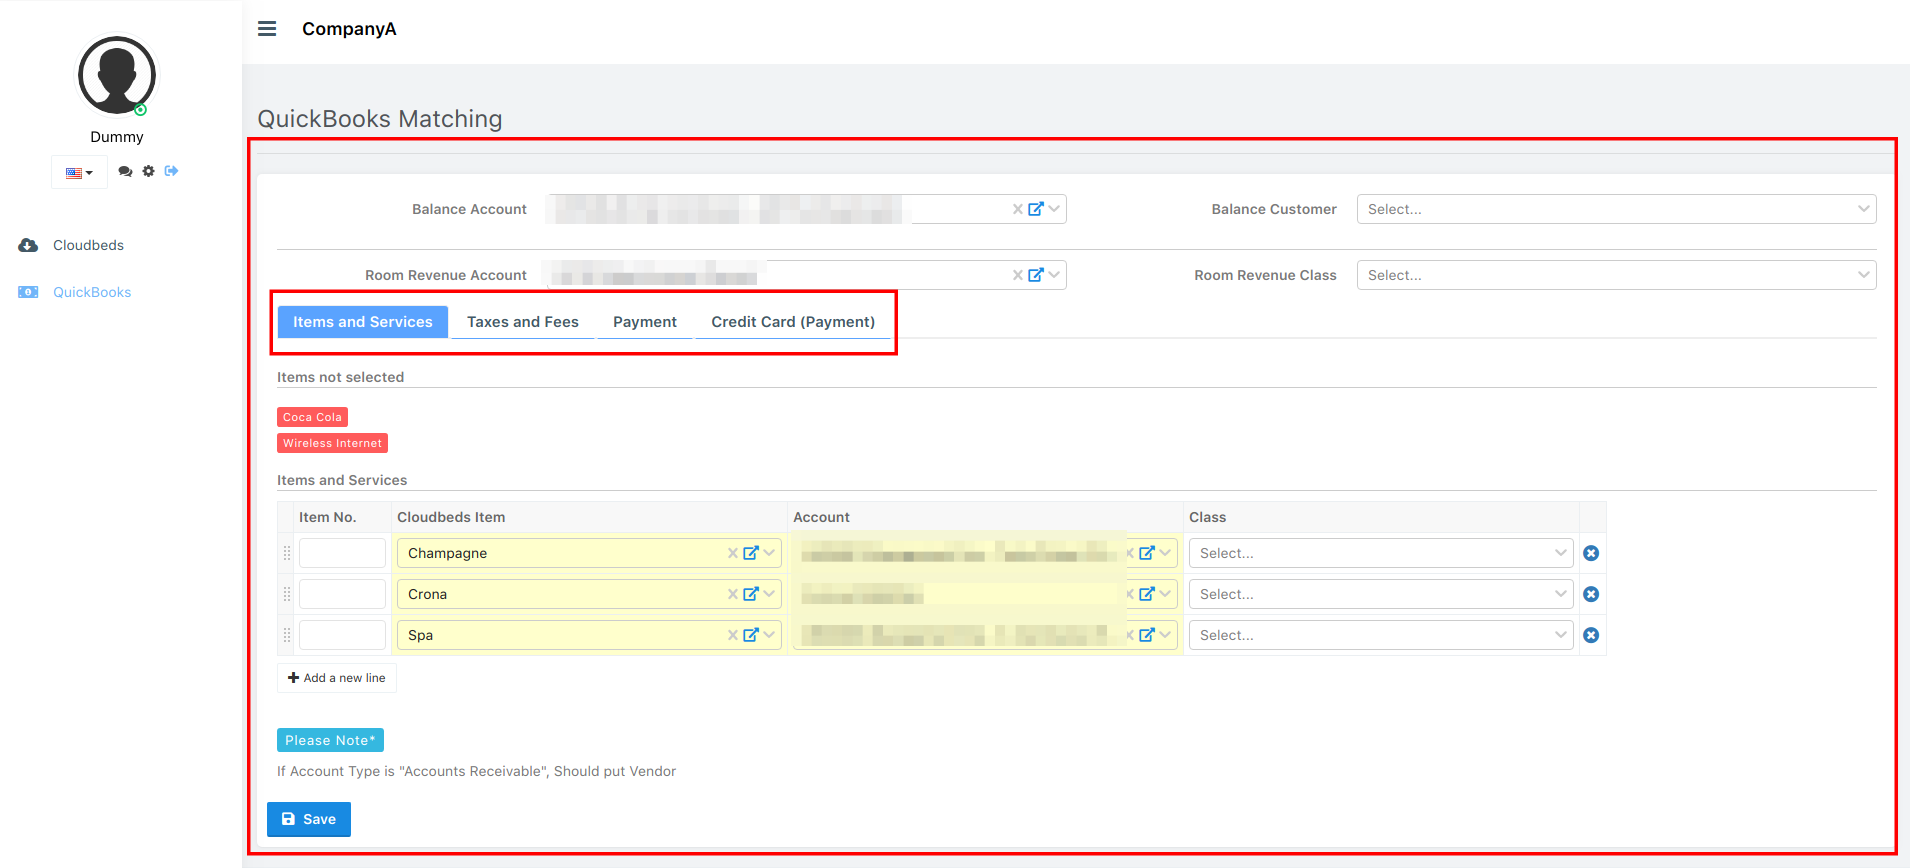
Please Note* : Please ensure that you define item code for all of items and services. You can check on Cloudbeds myFrontdesk by log in to Cloudbeds myFrontdesk, click "Manage" on menu bar and click "Items and Services" on the left side.

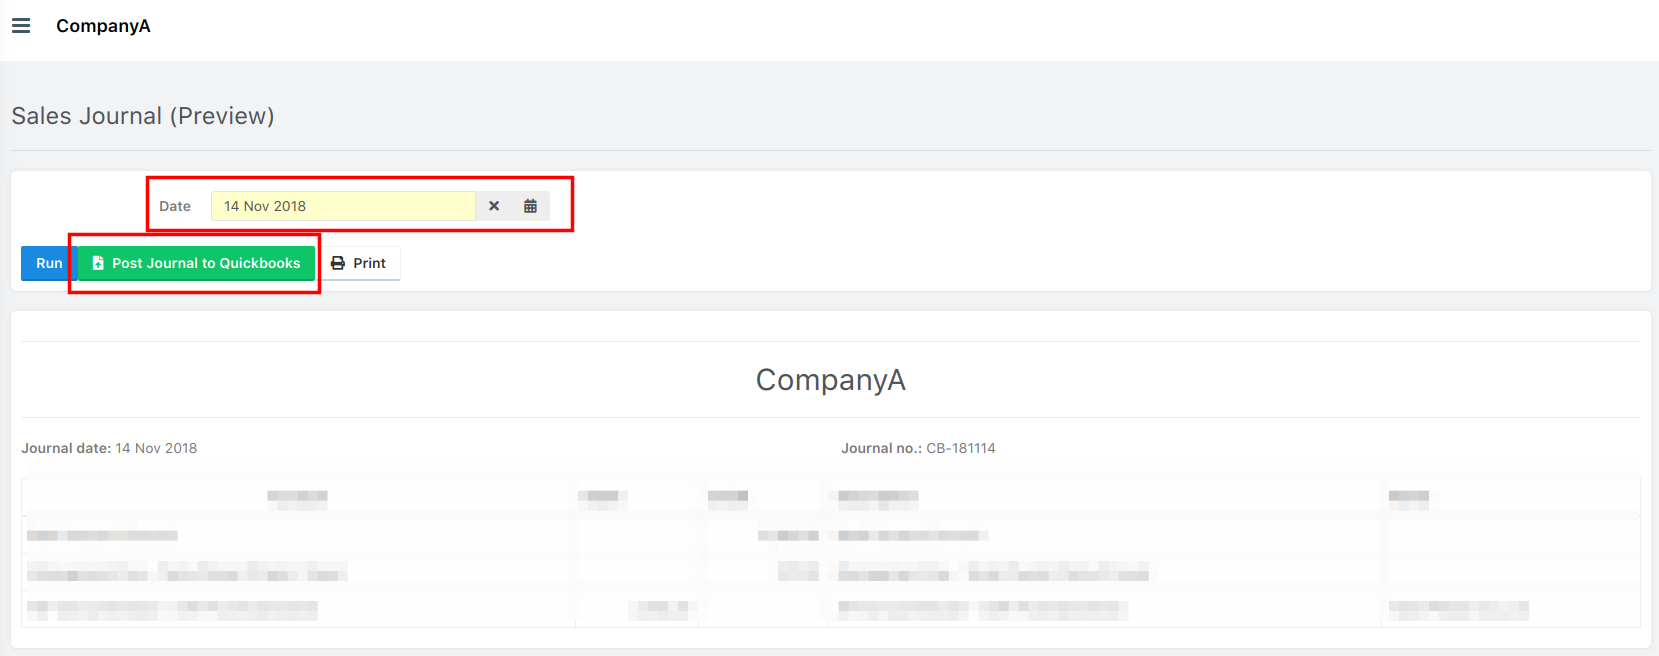
• Click on the "Quickbooks" Button on the left hand menu and then click "Journal (Preview, Posting)" to preview the journal entry for the selected date.
• If you would like to post or re-post your journal entry, simply select the date by changing the "Date" field and click on the "Post Journal to Quickbooks" button to posting the journal entry to your Quickbooks account.
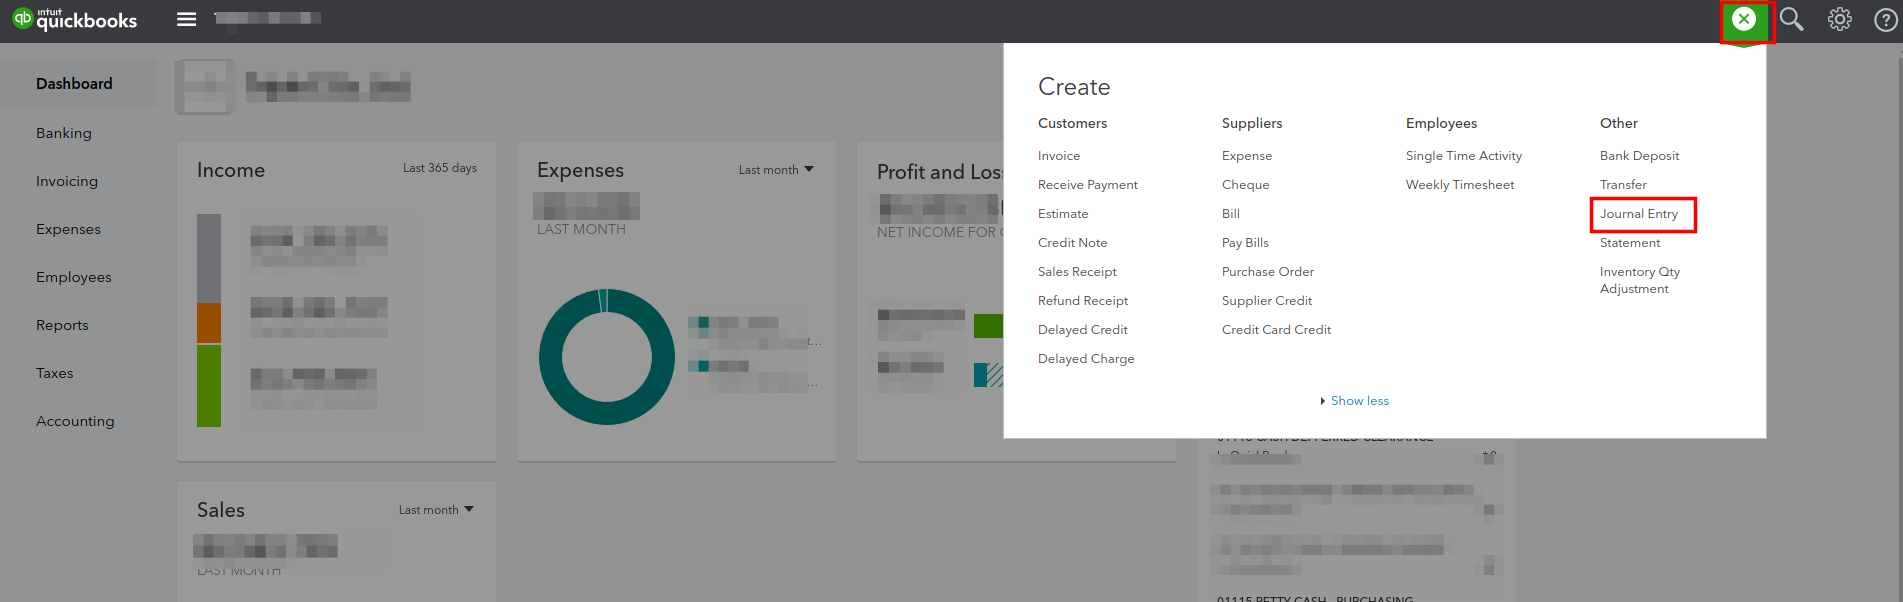
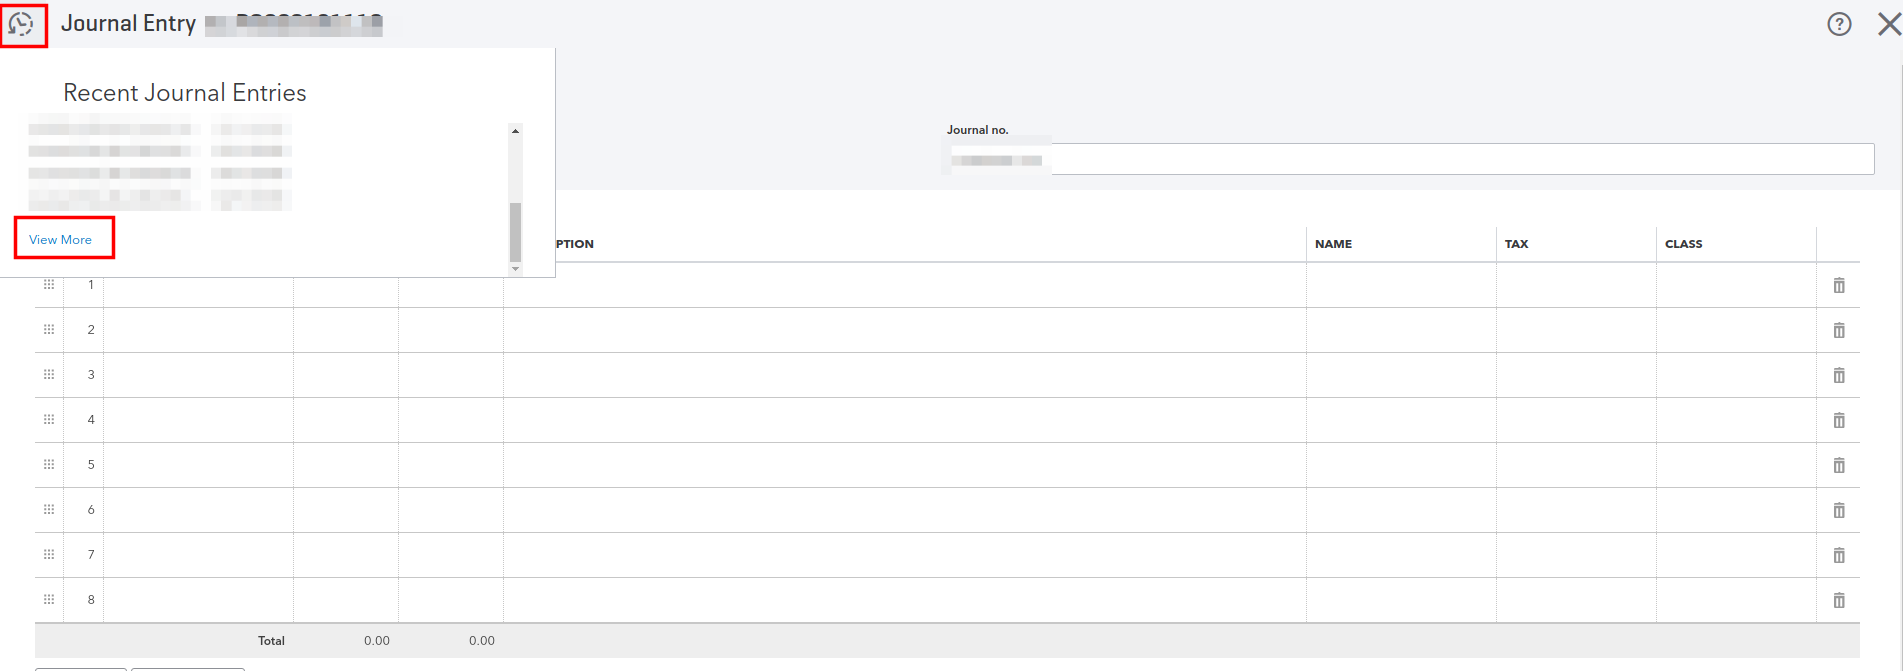
• To check that your journal entry has been posted correctly, you can login to Quickbooks, click on the create + sign > other > Journal Entry. Once the page has loaded, click on the 'clock' icon in the upper left hand corner to view your recent journal entries and click 'more' if you need to expand the list of old journals. See the screenshot below.
• To uninstall The Percentage App, click on the "Settings" icon within your Cloudbeds MyfrontDesk account and then click on "Manage Apps" under the "Integrations" heading.
• Find The Percentage App and click on the "uninstall" button at the bottom of the box.

• Please visit the following Cloudbeds knowledge base article for more detailed instructions to remove our APP: How to Disconnect an App from myFrontDesk
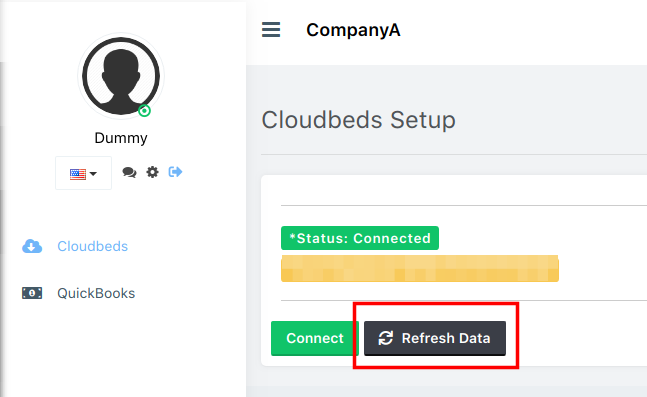
1. If you add/edit items on Cloudbeds's PMS, you need to go to the APP, click on "Cloudbeds", click the "Setup" button and click on the "Refresh Data" button.
2. Update your Quickbooks Matching by going to the App, clicking on the "Quickbooks" menu and then on the "Matching" button.
NOTE: If you change names of items & services, taxes & fees or payment types, the system will no longer be able to match your past data to a GL account and you may receive an error. It is recommended to add new items instead of editing old ones. If you do remove or edit any of these and you receive a journal preview error, please add that item back to Cloudbeds and run the preview again to ensure all is working.
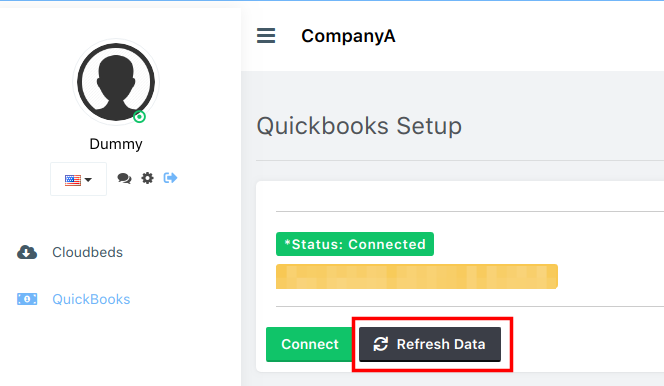
1. If you add/edit/delete accounts on Quickbooks, you need to go to the APP, click on "Quickbooks", click the "Setup" button and click on the "Refresh Data" button.
2. Update your Quickbooks Matching by going to the App, clicking on the "Quickbooks" menu and then on the "Matching" button.
To schedule automatic journal entry posting, please login to our app and go to QUICKBOOKS > QUICKBOOKS JOBS and once the page has loaded, slide the button to ACTIVE and new options will appear.
Step 1: Setup Journal Entry Email - This feature allows you to choose an email address to send a PDF copy of the journal entry to, after it has been posted to your accounting system. Slide the button to active and enter an email recipient address.
Step 2: Select a Scheduled Time - This setting allows you to choose the time at which your journal entry is posted each day. If the system is unable to run and you have entered an email address in the error box, it will send you an email to notify you.
Step 3: Setup the Profit & Loss Report - This setting allows you to set a recipient email address for the 'profit and loss' which is like a trial balance report, which will be emailed each day.
If you forgot to match a new item in the App, the revenue of that items it will not be sent to Quickbooks Accounting. But don't worry, you can simply repost any journal for any past date at any time in the past.
Sure, you can post journal entries for past dates at anytime.
No, you cannot post journal entres in advance. You can post journal entries for the past only!
If you cannot find the GL account you are looking for in the drop down menus on the mapping page, type the first letters of the GL account you are looking for and the GL account you are looking for will show up. The drop down menu only shows a small selection of your accounts, to find the ones you are looking for, you may need to start to type it into the box.
The Fields with the yellow background on the mapping page are required fields. Your journal entries will not post unless all the required fields are mapped.
Payment of our monhtly subscription can be made via Paypal links which we will provide to you. You can either select the monthly payment plan or annual payment plan where if you pay annually in advance, you receive an additional 8% discount from the monthly price.
In the Hospitality business, the Account Receivable (A/R) are divided in two, the Guest Ledger and the City Ledger. The Guest Ledger (or transient ledger) is the collection of accounts belonging to all registered guests, that have not yet checked out. In the daily Journal Entry it is the balance between all the Charges and all the Payments.
The accounting systems require to qualify each Account Receivable with a Client/Customer. In order to correctly book the Guest Ledger, a special Customer need to be created to associate the Credit with the registered guests of the property: the Guest Account. If this is not yet created in your Chart Of Account, you have to create one.
Due to changes made to the way in which Cloudbeds store historical data, we only currently support the posting of historical data since 01/01/2019.
The Base currency field is only required if your accounting system is multi-currency. Otherwise this can be left blank. However, it is essential that if your Cloudbeds account is in USD for example, that all the GL accounts mapped to Cloudbeds accounts are set to the same currency.
It may happen that you need to adjust things in your Cloudbeds Myfrontdesk account for past dates after your revenues have already been posted or that you have a mapping or other error and need to post your revenues. To Repost your revenues to your accounting system, login in to our app and follow these steps:
QUICKBOOKS > JOURNAL (PREVIEW, POSTING) > SELECT DATE > POST JOURNAL TO QUICKBOOKS
Note: Please note that if your revenues have already been posted, you need to login to your accounting system and remove the old journal entry manually.
If you receive a mapping error either by email or on the screen, it means that not all of your accounts have been connected to their corresponding GL account in your accounting system. For completeness purposes, our app will not post your revenues, unless 100% of it is accounted for and assigned to a GL account. Therefore to resolve this error please.
The GENERIC CREDIT CARD is a required field and is used for any credit cards payments on your system, NOT connected to a specific credit card type (Visa, Mastercard, AMEX, etc).
If you need to add new accounts in Cloudbeds, simply create the new accounts, go to our MATCHING or MAPPING page and click the green REFRESH DATA FROM CLOUDBEDS button. Once the process is finished, your new account should appear. If you would like to add new accounts to Quickbooks, you can add them then go to QUICKBOOKS > ACCOUNT > FETCH ACCOUNT and connect them to whichever Cloudbeds account you wish to connect it to.
If you have deleted and account in Cloudbeds and are now getting an error when you preview your journal entry, that is because our app is unable to match used/existing data in your system to it's corresponding GL account in your accounting system. Please add back the deleted account and the error will dissappear.
If you can see some of your accounts in the drop down but not the one you are looking for. Please start typing the name of the account you are looking for and if will show up.
For those using the Quickbooks interface, please go to QUICKBOOKS > ACCOUNT > FETCH ACCOUNT and then ensure that all are matched in the MATCHING section of the app.
The Percentage App interface needs to run after the end of day process from Cloudbeds has been completed, which usuall runs at 23:59. We therefore recommend that you schedule The Percentage App interface to run between 02:00 to 03:00 in your time zone. Please note, our interface time is based on GMT +7, please schedule the time accordingly via our app to ensure that it is running after the midnight deadline.
Our app does not have the ability to delete posted journal entries from your Quickbooks Account
IF (1) there was an adjustment or error in the past and the journal has already been posted to Quickbooks from our app OR (2) If a reservation is deleted from CB and a journal entry has already been posted to Quickbooks, the transaction will remain in Quickbooks.
To resolve this please log in directly to Quickbooks, delete the journal entry in question and repost the journal entry manually from within our app.
If transactions are voided in Cloudbeds for historical dates, after your journal entry has already been posted, please log into Quickbooks, delete the journal entry for that day and re-post it manually from our app. Journal entries are a snapshot of what is in Cloudbeds at the time of posting, so if that historical data is changed in any way, you would need to re-post the journal entry accordingly.
Yes! Activate the house accounts posting on the mapping page to include your house accounts revenues in the journal entry.
Yes! During the setup process you can either choose to send all room revenue to 1 general ledger account in Quickbooks or split the revenues for each unit to separate general ledger accounts.
If you would like one of our experienced accounting specialists to help setup your accounting interface, we can provide one-on-one support for a one time fee.
Yes! if you are starting a new Quickbooks account for an additional one time fee of $20 USD, we can provide you with a tried and tested Quickbooks import file containing a full recommended Chart of Account (COA) based on the Uniform System of Accounts for the Lodging Industry (USALI) to help get you started.
If you do not currently have a Quickbooks online account and would like to set one up, you can do so by clicking here and signing up for an account.
PLEASE NOTE:
1. The Base currency for both Cloudbeds MyFrontDesk and your accounting system should be the same. However, if your accounting system uses different currencies please ensure that the GL accounts which you have mapped are in the same currency as Cloudbeds MyFrontDesk.
2. If you are starting a new Quickbooks account for an additional one time fee of 20 USD, we can provide you with a tried and tested Quickbooks import file containing a full recommended Chart of Account (COA) based on the Uniform System of Accounts for the Lodging Industry (USALI) to help get you started.
3. When creating Items & Services, Taxes & Fees and Payment types in Cloudbeds, please make sure that there are no additional spaces or extra characters before or after the name.
4. We do not currently support the posting of POS data via our interface. POS data should be posted to your accounting system via a separate interface.
5. We do not currently support the posting of Cloudbeds Add-on data via our interface.
6. We do not currently interface with the Quickbooks Zeropaper Edition or Quickbooks offline editions, only Quickbooks Online.
7. We recommend creating specific account receivable payment types (E.G. AR Agoda, AR Expedia, AR Booking.com) in Cloudbeds and in your accounting system to make it easier to produce reports and statements for open balances as well as to make reconciliation easier.
8. We recommend creating Items & Services, Taxes & Fees and Payment types in Cloudbeds with the same names and codes as your GL accounts in your accounting system to make the matching process easier.
Quickbooks Interface Setup Videos
How to map your accounts
How to preview & post journal entries
How to setup auto posting
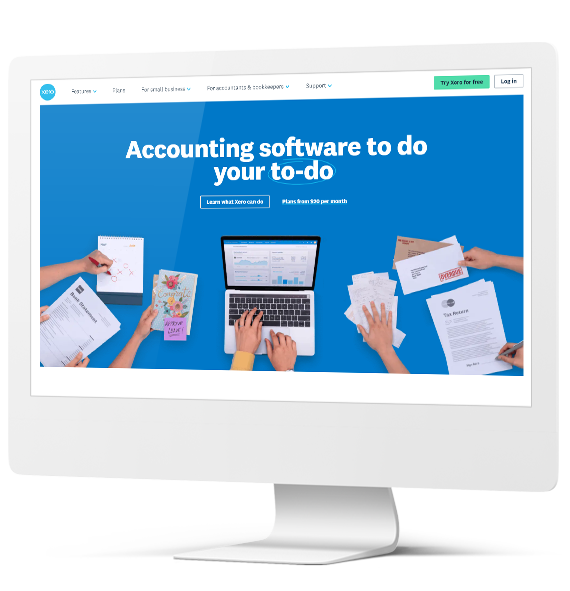
Resources & Help for The Xero Interface
Use our knowledgebase below to find out more about how to install and use The Percentage App Cloudbeds to Xero Accounting interface:
• Register a Percentage App Account here.
• Once registered you will receive an introductory email from our sales team (sales@thepercentageapp.co) along with a $1USD payment link.
• Once paid, your account will be created and you will receive the necessary login details and setup instructions by email.
NOTE: Before going further, please ensure that you are logged in to both your Cloudbeds myFrontdesk & Xero account in the same browser. Otherwise you'll be prompted to login during the process.
• Log in to The Percentage APP here.
• Click on the Cloudbeds Button on the left hand menu and then click Setup.
• Click on green “Connect” button, which will open the Cloudbeds’s Application Authorization page. Click "Approve" to allow The Percentage App to connect to Cloudbeds for the 1st time.
• Once the above process has completed successfully, it will show "Status: Connected" in green. If this does not show, please repeat the steps above.
• Click on the Xero Button on the left hand menu and then click Setup.
• Click on green “Connect” button, which will open the Xero Online Application Authorization page. Click "Approve" to allow The Percentage App to connect to Xero for the 1st time.
• Once the above process has completed successfully, it will show "Status: Connected" in green. If this does not show, please repeat the steps above.
• Click on the "Xero" Button on the left hand menu and then click "Matching"
• Add a G/L account for the "Balance Account", "Balance Customer", "Room Revenue Account" and "Room Revenue Class" then click Save.
• Select the "Items & Services" Tab and select an Item from the "Cloudbeds Item" drop down menu and match it to the corresponding G/L account in Xero until there are no more Cloudbeds items to select and there are no items left in red under the "items not selected" heading. Then click Save
• Select the "Taxes & Fees" Tab and enter the "Code" from the Cloudbeds Taxes and Fees Configuration page and match it to the corresponding G/L account in Xero until there are no more Cloudbeds taxes and fees to enter. Then click Save
• Select the "Payments" Tab and select an Item from the "Cloudbeds Item" drop down menu and match it to the corresponding G/L account in Xero until there are no more Cloudbeds payments to select and there are no items left in red under the "items not selected" heading. Then click Save
• Select the "Credit Card (Payments)" Tab and select an Item from the "Cloudbeds Item" drop down menu and match it to the corresponding G/L account in Xero until there are no more Cloudbeds Credit Card Payments to select and there are no items left in red under the "items not selected" heading. Then click Save
Please Note* : Please ensure that you define item code for all of items and services. You can check on Cloudbeds myFrontdesk by log in to Cloudbeds myFrontdesk, click "Manage" on menu bar and click "Items and Services" on the left side.

• Click on the "Xero" Button on the left hand menu and then click "Journal (Preview, Posting)" to preview the journal entry for the selected date.
• If you would like to post or re-post your journal entry, simply select the date by changing the "Date" field and click on the "Post Journal to Xero" button to posting the journal entry to your Xero account.
• To check that your journal entry has been posted correctly, you can login to Xero. Go to the Accounting menu, select Reports, then click Journal report. If you have the adviser user role, you can also access manual journals by going to the Accounting menu, selecting Advanced, then clicking Manual journals.
• To uninstall The % App, click on the "Settings" icon within your Cloudbeds MyfrontDesk account and then click on "Manage Apps" under the "Integrations" heading.
• Find The % App and click on the "uninstall" button at the bottom of the box.
• Please visit the following Cloudbeds knowledge base article for more detailed instructions to remove our APP: How to Disconnect an App from myFrontDesk
1. If you add/edit items on Cloudbeds's PMS, you need to go to the APP, click on "Cloudbeds", click the "Setup" button and click on the "Refresh Data" button.
2. Update your Xero Matching by going to the App, clicking on the "Xero" menu and then on the "Matching" button.
NOTE: If you change names of items & services, taxes & fees or payment types, the system will no longer be able to match your past data to a GL account and you may receive an error. It is recommended to add new items instead of editing old ones. If you do remove or edit any of these and you receive a journal preview error, please add that item back to Cloudbeds and run the preview again to ensure all is working.
To schedule automatic journal entry posting, please login to our app and go to XERO > XERO JOBS and once the page has loaded, slide the button to ACTIVE and new options will appear.
Step 1: Setup Journal Entry Email - This feature allows you to choose an email address to send a PDF copy of the journal entry to, after it has been posted to your accounting system. Slide the button to active and enter an email recipient address.
Step 2: Select a Scheduled Time - This setting allows you to choose the time at which your journal entry is posted each day. If the system is unable to run and you have entered an email address in the error box, it will send you an email to notify you.
Step 3: Setup the Profit & Loss Report - This setting allows you to set a recipient email address for the 'profit and loss' which is like a trial balance report, which will be emailed each day.
If you forgot to match a new item in the App, the revenue of that items it will not be sent to Xero. But don't worry, you can simply repost any journal for any past date at any time in the past.
Sure, you can post journal entries for past dates at anytime.
No, you cannot post journal entres in advance. You can post journal entries for the past only!
If you cannot find the GL account you are looking for in the drop down menus on the mapping page, type the first letters of the GL account you are looking for and the GL account you are looking for will show up. The drop down menu only shows a small selection of your accounts, to find the ones you are looking for, you may need to start to type it into the box.
The Fields with the yellow background on the mapping page are required fields. Your journal entries will not post unless all the required fields are mapped.
Payment of our monhtly subscription can be made via Paypal links which we will provide to you. You can either select the monthly payment plan or annual payment plan where if you pay annually in advance, you receive an additional 8% discount from the monthly price.
In the Hospitality business, the Account Receivable (A/R) are divided in two, the Guest Ledger and the City Ledger. The Guest Ledger (or transient ledger) is the collection of accounts belonging to all registered guests, that have not yet checked out. In the daily Journal Entry it is the balance between all the Charges and all the Payments.
The accounting systems require to qualify each Account Receivable with a Client/Customer. In order to correctly book the Guest Ledger, a special Customer need to be created to associate the Credit with the registered guests of the property: the Guest Account. If this is not yet created in your Chart Of Account, you have to create one.
Due to changes made to the way in which Cloudbeds store historical data, we only currently support the posting of historical data since 01/01/2019.
The Base currency field is only required if your accounting system is multi-currency. Otherwise this can be left blank. However, it is essential that if your Cloudbeds account is in USD for example, that all the GL accounts mapped to Cloudbeds accounts are set to the same currency.
It may happen that you need to adjust things in your Cloudbeds Myfrontdesk account for past dates after your revenues have already been posted or that you have a mapping or other error and need to post your revenues. To Repost your revenues to your accounting system, login in to our app and follow these steps:
XERO > JOURNAL (PREVIEW, POSTING) > SELECT DATE > POST JOURNAL TO XERO
Note: Please note that if your revenues have already been posted, you need to login to your accounting system and remove the old journal entry manually.
If you receive a mapping error either by email or on the screen, it means that not all of your accounts have been connected to their corresponding GL account in your accounting system. For completeness purposes, our app will not post your revenues, unless 100% of it is accounted for and assigned to a GL account. Therefore to resolve this error please
The GENERIC CREDIT CARD is a required field and is used for any credit cards payments on your system, NOT connected to a specific credit card type (Visa, Mastercard, AMEX, etc).
If you need to add new accounts in Cloudbeds, simply create the new accounts, go to our MATCHING or MAPPING page and click the green REFRESH DATA FROM CLOUDBEDS button. Once the process is finished, your new account should appear. If you would like to add new accounts to Xero, you can add them then go to XERO > ACCOUNTS > FETCH ACCOUNTS and connect them to whichever Cloudbeds account you wish to connect it to.
If you have deleted and account in Cloudbeds and are now getting an error when you preview your journal entry, that is because our app is unable to match used/existing data in your system to it's corresponding GL account in your accounting system. Please add back the deleted account and the error will dissappear.
If you can see some of your accounts in the drop down but not the one you are looking for. Please start typing the name of the account you are looking for and if will show up.
For those using the Xero interface, please do to XERO > ACCOUNTS > FETCH ACCOUNTS and then ensure that all are matched in the MAPPING section of the app.
The % App interface needs to run after the end of day process from Cloudbeds has been completed, which usuall runs at 23:59. We therefore recommend that you schedule The % App interface to run between 02:00 to 03:00 in your time zone. Please note, our interface time is based on GMT +7, please schedule the time accordingly via our app to ensure that it is running after the midnight deadline.
Our app does not have the ability to delete posted journal entries from your Xero Account
IF (1) there was an adjustment or error in the past and the journal has already been posted to Xero from our app OR (2) If a reservation is deleted from CB and a journal entry has already been posted to Xero, the transaction will remain in Xero.
To resolve this please log in directly to Xero, delete the journal entry in question and repost the journal entry manually from within our app.
If transactions are voided in Cloudbeds for historical dates, after your journal entry has already been posted, please log into Xero, delete the journal entry for that day and re-post it manually from our app. Journal entries are a snapshot of what is in Cloudbeds at the time of posting, so if that historical data is changed in any way, you would need to re-post the journal entry accordingly.
If you would like one of our experienced accounting specialists to help setup your accounting interface, we can provide one-on-one support for a one time fee.
PLEASE NOTE:
1. The Base currency for both Cloudbeds MyFrontDesk and your accounting system should be the same. However, if your accounting system uses different currencies please ensure that the GL accounts which you have mapped are in the same currency as Cloudbeds MyFrontDesk.
2. When creating Items & Services, Taxes & Fees and Payment types in Cloudbeds, please make sure that there are no additional spaces or extra characters before or after the name.
3. We do not currently support the posting of POS data via our interface. POS data should be posted to your accounting system via a separate interface.
4. We do not currently support the posting of Cloudbeds Add-on data via our interface.
5. We recommend creating specific account receivable payment types (E.G. AR Agoda, AR Expedia, AR Booking.com) in Cloudbeds and in your accounting system to make it easier to produce reports and statements for open balances as well as to make reconciliation easier.
6. We recommend creating Items & Services, Taxes & Fees and Payment types in Cloudbeds with the same names and codes as your GL accounts in your accounting system to make the matching process easier.
Xero Interface Setup Videos
How to connect
How to map your accounts
How to preview & post journal entries manually
How to setup auto posting


Get in Contact
Want to know more about The Percentage App?
Find out more about how The Percentage App can help you increase your revenues, save you time and save you money! Have questions? Get in contact today!